Today, I thought I would write about a fairly old project of mine – A raspberry pi based desktop arcade machine capable of running MAME. I started this project at the end of November last year, having seen similar projects on-line, and quickly went through a process of building a small prototype, then moving into a full CNC’d case, which would be able to stand up to quite a bit of abuse!
Software
When I built the project, It was based on Shea Silverman’s MAME binary for the Raspberry Pi. However, since then, there have been many developments… more specifically by the same person over at pimame.org. This (as I understand) is a whole raspberry pi OS with all of the most popular emulators pre-installed.
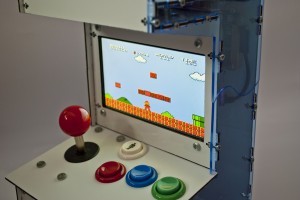
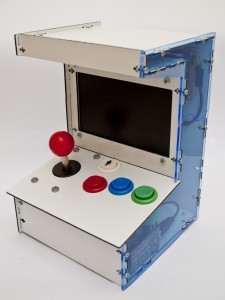
This shows the machine powered up, with Super Mario running on it!
I also decided to build a small little interface which would run on boot. This used a simple bash script with ‘Whiptail’, into which I then built all of the commands to launch each game in the library. This gives users an easy way of navigating between, and choosing different games on the Raspberry Pi Arcade.
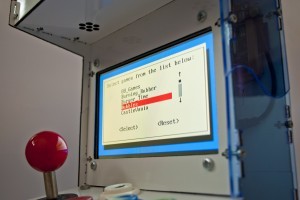
This photo shows the bash / Whiptail based interface for choosing games.
Controls
This was probably the most challenging part of the build. In order to create a small, cheap controller for the arcade buttons, I decided to use this arcade controller, developed specifically for MAME, and Based of the V-USB code. In order to create a board that would fit inside the case, I Used the Atmega-8 based version, and started by generating G-code files which I would be able to process and cut using my home-made CNC machine. This circuit board was then populated and soldered up, using leaded solder . I then tested this out on both my PC and the raspberry PI using a few random buttons I had lying around.
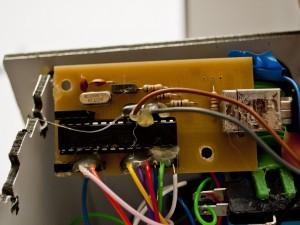
A front view of the USB joystick controller board
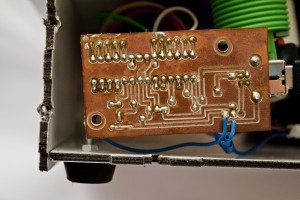
Here you can see the rear of the circuit board which I etched on my CNC
Currently I only have 1 player buttons on the arcade machine as its small space doesn’t leave a lot of room for a second player. However I don’t see why you couldn’t create another small add-on module perhaps using a 15 pin D-Type connector to allow a few more games to be played, giving yourself a 2 player Raspberry Pi Arcade.
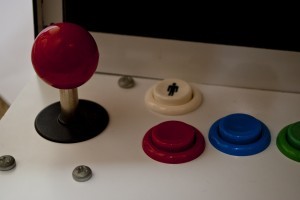
This shows the view from inside the box, looking at all of the arcade buttons
This shows a view of the Raspberry Pi Arcade buttons and joystick, mounted on dibond
That controller also has support for certain common keyboard commands when a ‘shift’ button is pressed. This is brought out to a small switch mounted inside the unit along with a switch for credit. These are quite easily accessible using a paper-clip through a small hole drilled directly above each button in the outer case. This served as a nice easy way to stop people other than me giving out credits when I was showing it around.
Hardware
The case was designed using adobe illustrator, as it is a package that I am very familiar with. I started with a profile, then added on some extra panels, and lugs to connect the different plates together. I also had to split the side and back panels, As they were larger than my CNCs maximum build dimensions. The outlines of these Raspberry Pi Arcade parts were then printed out, and cut from cardboard by hand. This was then assembled to create a small prototype, and gave me the confidence to start up my CNC without worrying about the parts not fitting. I decided to make the Case mainly out of Aluminium Di-bond, as at the time I had not quite got the knack of cutting acrylic with my CNC. Since then I have upgraded the machine to include a blue tinted acrylic side. This was cut using a 1.5mm single flute carbide cutter, with cast acrylic. This lets people see exactly how the machine is working, and makes an interesting starting point for conversation.
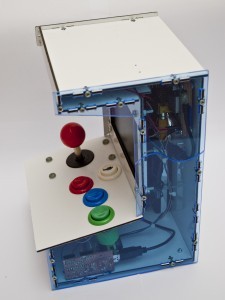
This shows the profile of the MAME arcade, and a view through the perspex side.
Here you can see the clear style of the arcade machine, with the classical overhang

This Image shows the rear view, with all of the bolts used for mounting the variuous parts – battery and Raspberry Pi. There is also a small access hole for charging the battery.
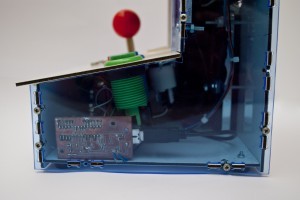
Here you can see the Buttons, both on top of and inside the machine, as well as the Battery at the rear on the right hand side.
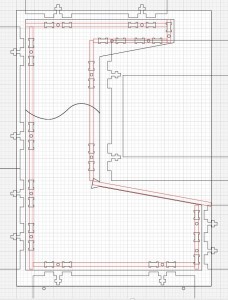
This is the basis of the design files. If you would like me to pout up the whole set of illustrator files, please contact me. I am sure I could convert them as well if required.
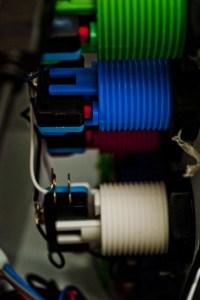
All of the buttons are standard arcade style, and are arranged in a fairly ergonomic fashion. There is also the joystick which I have configured in the 8 way setting, to give the most flexibility in terms of possible games.
One of the most important parts of the machine has to me the monitor – it would be useless without that! In order to keep cost down I chose to use a fairly cheap monitor, aimed at car users for a reversing camera system. As such it does not have a very high resolution, but it is sill enough to play most games I have tried. Here is a link to the display… 7 inch TFT LCD.
Another important point is power. I decided to use the old version of this Rechargeable USB battery from Anker, as I had it lying around the house. There is a drawback of the new one however, which is its lack of a 12v output. I guess you could try to find one with a higher voltage output somewhere else on the web, or maybe just have a wired arcade machine. It is no hassle to set up a small 12 – 5v voltage regulator based on something like the 7805 v-reg. Alternatively, If you are confident with tinkering, you may be able to find a way of running the monitor of 5v, which would be the best solution.
Finally, for speakers I chose to use the cheapest available option. I bought a small cheap unit from E-Bay which I took apart, connected up the battery terminals to the Pi’s regulated 5v output, and placed each speaker abouve the grill in the overhang.
Construction
This is the easiest part of the whole thing – putting it together! I started by setting up the Pi, buttons, joystick etc. outside the case (which I had already built leaving off one side and the back). Once I had everything tested and any issues ironed out, I popped it all into the case, screwed on the side and booted it up… Surprisingly It all worked!
Please contact me if you have any questions or suggestions, or need help building your own Raspberry Pi Arcade. Thanks